Welcome to my Web site

Welcome to my website. This site is for folks who build or would like to build plastic model ships. I’ve been building ship models for many years and I still get as much enjoyment from the hobby as I did when I started. If you are an occasional modeler, serious modeler or if you’ve been away from the hobby for awhile and are coming back, I think you will enjoy this site.

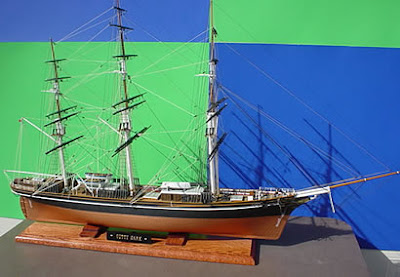
I chose Revells’ Cutty Sark as the launch project because there are a large number of these kits out there in closets, attics and modelers collections, waiting to be built. Also, this kit builds into a pretty impressive ship model, no matter where the modelers’ skill level is.

The plan is for this site to grow over time, featuring a different model about every month. Previous models will be archived for reference and new visitors to the site. As you may have already noticed, this site is written in a blog foremat with the latest post on top and previous posts in decending order. I hope that modelers will find this website enjoyable and useful and will visit often……………..John

Revells Yacht America


The Model was attached.........


The model was attached with the wood screw I mentioned earlier and tightened down. Be careful here, not too tight. White glue is applied along the gap where the model and foil meet. A toothpick works good for getting the glue into the small gaps. After the glue is dried, paint the wake. I use testors Flat White. with pretty good results . Some modelers may like to experiment with different colors. Studying photos of ships to see how the wakes look for different ships and different conditions e helpful here. Again, step back and enjoy your accomplishment!

After the cement has dried........


After the cement has dried, use an exacto knife to trim away the excess foil . I extended the masking to the bottom of the base for painting. A spray can of Model Master Glossy Dark Sea Blue works best for me to paint the water surface. It is available in jars ,too. It takes two coats to get full coverage.After the paint dries, remove the masking and check out the ocean!


When the contact cement is tacky........


When the contact cement is tacky (read the directions on the can) carefully and slowly place the foil, glue side down, onto the base, using the edge traced before with your finger as a guide. Press down along the edge with your fingers to get a good bond, but just along the edge. Set it aside for a while to let it dry

Place the foil over the base.....


Place the foil over the base, it doesn’t matter which side is up, and trace the outline of the base into the foil with your finger. Lift the foil from the base and flip it over. Masking off the sides of the base will prevent sloped over cement from spoiling the appearance of the base. Apply contact cement to bottom surface of the foil and the top of the base. Contact cement gives off pretty strong ,flammable fumes and should be used only with very good ventilation. I use this stuff out in the garage to be safe.

Building a realistic display for waterline models


How to build a realistic display base for waterline models.
will b There are a lot of ways to do this. I’ve had good results with this. The front of a drawer, purchased at a local lumber yard or home improvement store , is the base itself. The routed sides will make for a nice finished look. I gave this one a light oak stain and a few coats of varnish. I’ll be using a wood screw to hold the model onto the base. I located where the screw will line up with the hole I already drilled in the bottom of the model and drilled and countersunk a hole in the base The water will be aluminum foil, roll out a piece of foil a little longer then the base. Carefully crinkle it up a few times and stretch it back out to give the surface its texture. Be careful and work slowly since the foil rips easy. If it rips a little its ok anyway but if it rips pretty bad just throw it away and tear off another piece and start again.

The Wrap up


The model is now finished and if you are building one too, step back and enjoy it. If you wish to mount the model on a simulated ocean display, I've posted a how-to showing how I do it.


Weathering


The cardinal rule of weathering is "Don't Overdo It". The smaller the scale the more this applies. Since I like to use pastells for weathering, I don't complete this step until after the model is mounted. There tends to be pastell fingerprints all over the model if I handel it. Black pastell was rubbed onto a piece of paper and ,using a stubby brush, applied to the top of the funnel. Rust
was duplicated with brown pastell and a dab of orange pastell on top of it. a Q-tip is used to remove the
excess.

Rigging Pt.2 and flag


I used the instruction sheet and the box art as a rigging guide. Rigging is an area that can be overdone since even using spru, the thickness is out of scale. I usually install enough rigging to get the effect and stop there. If you build this kit or one like it it's up to you. The model kit comes without a flag, so I used one from a decal sheet I have. After soaking it and removing tit from the backing paper,I couldn't, for the life of me, get that thing to wrap around the length of spru I was using for a halyard. I finally folded both sides and glued them together. I then used a drop of super glue to attach the flag to the halyard. Finally, the last assembly items are the boats hanging from the davits. Just to breakup the monotony of the light gray, the boats were painted a darker shade of gray. I used a small drill bit to enlarge the attachment holes in the boats since I wasn't sure if they would line up with the davits. This turned out to be a big help and the boats were installed with thick super glue and a little accelerator.

Rigging Pt.1 and ships boats


I like to use stretched spru for rigging on small scale ships like this one. There are plenty of outher materials available but I've had good luck with spru, so far. As always, i start from the inside and work outboard. A pair of dividers is used to measure the length I'll need for each piece. White glue, mixed with water (50/50) works great for attaching the rigging. Using tweezers to hold the cut legnth od spru, dip the ends inthe glue and place it where you want it. I usually cut the spru a little bit long and and install it with the excess lenght in a convient place so I can trim it off after the glue dries.


Photo etched parts Pt.4


Since the sides of this ship are a long smooth curve, the railings along the main deck were relatively easy to install. The boat davits help support the railings too. Some may call this cheating but, I also removed a few small cleats from the deck edge with an exacto knife. The larger cleats were out of the path of the railings and were not removed. After the railings were installed and the glue dried, I used a small brush and light gray paint to paint the space between the rail and the deck edge for a finished look.

Photo etched parts Pt.3


I start installing the railings from the center of the ship and work toward the out side. This helps (but doesn't always prevent) railings which have been installed from being damaged. On small scale models like this one I like to use white glue to attach the railings. Super glue is good but is very unforgiving of errors. White glue allows time to get the position right and if necessary, the glue can be removed with water and tried again. A needle , mounted in a dowel, is the tool I use to apply a small amount of white glue to the deck edge. When installing PE railings, i also try to keep the number of bends to two. I've found that trying to make one long length of railing with many bends in it usually results in fit problems. Better to use smaller lengths with one or two bends.

Boat davits

I left the boat davits off until now to prevent them from getting broken off. Liquid cement from a squeeze bottle was used to attache them to the deck. Having them on now will be helpful for positioning the PE railings.

Photo etched parts Pt.2


The yard arms, shown here, were attached with super glue. I like to use the thick super glue for this kind of application. The slow setup time allows me to correctly position the parts. The rigging for the boat crane to the mast was installed the same way.

Photo etched parts Pt. 1


Photo Etched Parts

With most of the model assembled, it's time for the PE details to go on. For me this is the most challenging part of the build. Staying away from coffee (which I really enjoy) and doing this on a day when I'm not in a hurry helps a great deal. I like to paint the PE details I'll need while they are still on the frett. Since these parts are very small and delicate, the paint must be quite thin. An Airbrush is definitely the best way to paint them, but not everyone has one. A good alternative method is to thin the paint about 50/50 and paint two coats with a brush. The light gray I used is acrylic and I've found rubbing alcohol to be a good thinner for this. Mixing one drop of rubbing alcohol with each drop of paint in a small watercolor dish works pretty good. After the paint dries I cut the detail parts needed from the frett using an exacto knife on a piece of glass.

A new funnel cap


I did the paint-wash-drybrush technique on all the parts above the main deck and installed them, except for the boat davits.

As usual, I managed to goof something up. In this case I completely destroyed the funnel cap (part # A36) while trying to open up the center for the photoetched grill. I made a passable replacement funnel cap from sheet styrene and installed it on the funnel.

Superstructure and guns


The superstructure and guns were assembled per the instruction sheet, Squadron Green putty was used where necessary to fill seams. The smaller guns were assembled and painted while the gun bases were still on the spru tree.

Using a wash to make details stand out


To help the deck details stand out, I use a water color wash of dark brown around all the deck details. I used a dark gray wash around the focsal details. After the wash is dry I remove the excess with a wet brush. Flat white was drybrushed onto the raised details for more visability.

Painting the hull and deck


I painted the hull, casements and all deck details with two coats of Polly scale Light Gray acrylic. After the gray dried I painted the deck with Polly scale deck Tan Acrylic, FS1735.I've found the best way to paint a part that is busy with details to paint the raised relief detail first. The lower area of the deck is painted next so I can push or flow the paint up to the raised areas. Two coats of deck tan were needed to get full coverage. This is typical for Acrylic paints.

Hull and Main Deck


To make it easier to handle the model during assembly I attached a piece of balsa wood to the bottom of the hull with a small wood screw. A small hole was drilled in the bottom of the waterline plate for this purposeand main deck are molded in one piece so this step mostly concerns clean up and painting. After sanding off the molding flash and gluing the waterline onto the hull, I washed the hull in a solution of lukewarm water and dishwashing soap. This is to remove sanding residue, mold release agent and skin oils. A toothbrush helps in this process, too. This was set aside to dry overnight after dabbing with a paper towel.


.

HMS Rodney in 1/700 scale


The HMS Rodney and her sister ship HMS Nelson are very unique looking battleships with their 3 main battery turrets located ahead of the superstructure. The superstructure itself is located quit a bit aft of the center of the ship. This is a 1/700 scale Tamiya kit and as usual it is very well molded with sharp and crisp detail. I also ordered a photo etched detail set from gold medal models to complete the model. I decided to build the Rodney in her pre-war configuration, painted light gray.

The Wrap-up


The model kit comes with an assortment of figures depicting sailors performing various tasks. Painting and mounting them on the model is a matter of individual preference. I usually complete a model with figures if it is shown as underway, or at sea. For this reason I left them off this Cutty Sark. Clipper ships are beautiful ship models , no matter how minimal or elaborately they are built. Revells’ Cutty Sark is not the kind of model that can be built quickly though. I’ve been building models for decades and I am familiar with many techniques and I have quite a few tools to use and it still took me 8 months. That said, it will build into a beautiful model if you are patient. Take your time with the rigging in particular. Some days I spent an hour and only rigged one brace, but building ship models is a hobby I enjoy, so the time spent is spent well. If you are building or thinking about building this kit, I hope this article will be helpful.


Boats & Flag

The ships boats are left off until the all the rigging is finished, otherwise they will be in the way of the belaying points for the rigging. The boat skids and davits were all painted white. The insides of the boats were painted two shades of brown. The boat exteriors were painted white with blue trim. I don’t know if the blue trim is historically accurate but it does add a bit of needed color. The oars were painted tan.

Finally, the flag. No ship model is complete without a flag. The British merchant flag or “Red Duster” was cut from the sheet and folded around a thread and glued with a drop of Elmer’s glue.

After the glue dried I touched up the flags’ edges with red paint and rigged it to the peak of the spanker gaff